Visual explanations for CNNs with Grad-CAM
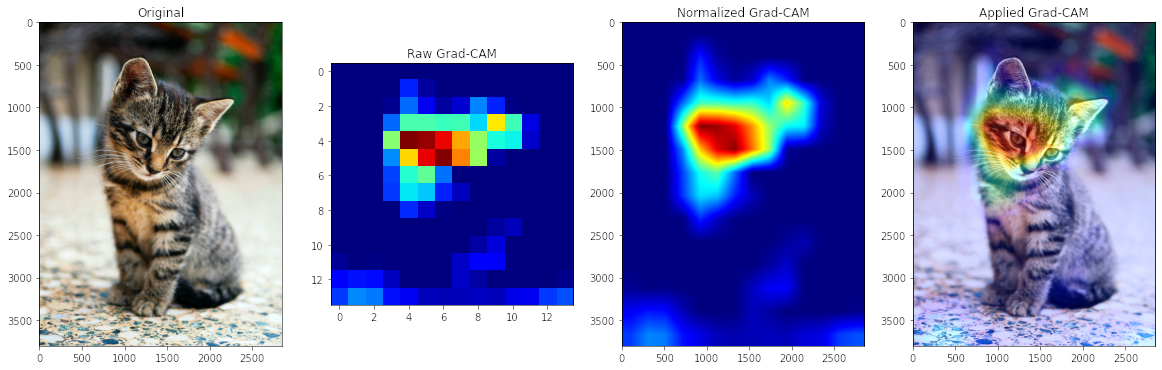
Recently, I read Deep Learning with Python from François Chollet. In chapter 5.4.3 he describes how class activation maps (CAM) can be used to produce heatmaps of class activation over input images that help to understand which regions of an image led a CNN to its final classification decision. In the following example I use a VGG16 model that was pretrained on the ImageNet dataset, feed it a cat picture and let the CAM visualization generate a heatmap of how cat-like the regions in the image are.
The Grad-CAM implementation mentioned in the book is taken from the paper Grad-CAM: Visual Explanations from Deep Networks via Gradient-based Localization. For the input image the output feature map of the last convolution layer is used to weight every channel in that feature map by the gradient of the class with respect to the channel. The result can be interpreted as a spatial map of how intensely the input image activates the class.
Let’s load the pretrained VGG16 model:
import tensorflow as tf
vgg16_model = tf.keras.applications.VGG16(weights='imagenet', include_top=True)
The model was trained on images of size 224 x 224, so we need to resize our cat picture and normalize the values. OpenCV reads images in BGR order that we can transform to RGB which is expected by the model and Matplotlib.
import cv2
import numpy as np

img_bgr = cv2.imread('edgar-nKC772R_qog-unsplash.jpg') #source: https://unsplash.com/photos/nKC772R_qog
img_rgb = cv2.cvtColor(img_bgr, cv2.COLOR_BGR2RGB)

img_resized = cv2.resize(img_rgb, (224, 224), interpolation = cv2.INTER_CUBIC)

img_tensor = np.expand_dims(img_resized, axis=0) #add batch axis, shape (1,224,224,3)
img_tensor = tf.keras.applications.vgg16.preprocess_input(img_tensor)
Let’s check if our model correctly classifies the image. The output class with the highest probability is tabby, tabby cat.
predictions = vgg16_model.predict(img_tensor)
print(tf.keras.applications.vgg16.decode_predictions(predictions)[0])

>> [('n02123045', 'tabby', 0.47227493), ('n02123159', 'tiger_cat', 0.29191706), ('n02124075', 'Egyptian_cat', 0.21251461), ('n06785654', 'crossword_puzzle', 0.0053405324), ('n03223299', 'doormat', 0.0024195109)]
The book is from 2017, so the code is not compatible with TensorFlow 2. Instead I found a StackOverflow answer that solves the problem:
last_conv_layer = vgg16_model.get_layer('block5_conv3') #Output feature map of last convolutional layer in VGG16

heatmap_model = tf.keras.models.Model(inputs=vgg16_model.input,
                                      outputs=[last_conv_layer.output, vgg16_model.output])

with tf.GradientTape() as gtape:
    conv_output, predictions = heatmap_model(img_tensor)
    loss = predictions[:, np.argmax(predictions[0])]
    grads = gtape.gradient(loss, conv_output)
    pooled_grads = tf.keras.backend.mean(grads, axis=(0, 1, 2)) #Vector of shape (512,), where each entry is the mean intensity of the gradient over a specific feature-map channel

heatmap = tf.reduce_mean(tf.multiply(pooled_grads, conv_output), axis=-1)
heatmap = np.maximum(heatmap, 0)
max_heat = np.max(heatmap)
if max_heat == 0:
    max_heat = 1e-10
heatmap /= max_heat
Now we just need to resize the heatmap to be the same size as the original image, apply a suitable color map and superimpose it with the original image:
import matplotlib.pyplot as plt
%matplotlib inline

squeezed_hm = np.squeeze(heatmap)
normalized_hm = cv2.resize(squeezed_hm, (img_bgr.shape[1], img_bgr.shape[0]))
normalized_hm = (255 * normalized_hm).astype(np.uint8)
normalized_hm = cv2.applyColorMap(normalized_hm, cv2.COLORMAP_JET)

superimposed_img = cv2.addWeighted(normalized_hm, 0.4, img_bgr, 0.9, 0)

rows, cols = 1, 4
fig,axs = plt.subplots(rows, cols, figsize=(20, 20))

axs[0].imshow(cv2.cvtColor(img_bgr, cv2.COLOR_BGR2RGB))
axs[0].set_title('Original')

axs[1].imshow(squeezed_hm, cmap='jet')
axs[1].set_title('Raw Grad-CAM')

axs[2].imshow(cv2.cvtColor(normalized_hm, cv2.COLOR_BGR2RGB))
axs[2].set_title('Normalized Grad-CAM')

axs[3].imshow(cv2.cvtColor(superimposed_img, cv2.COLOR_BGR2RGB))
axs[3].set_title('Applied Grad-CAM')
The result is the image you see at the top of the post.